Nx plugins getting started
Nx Vite TypeScript Plugins 02-12-2022

Overview
An Nx plugin is an npm package to extend Nx itself. The most significant parts of that are generators and executors. Generators are the way to create files from templates, and executors are runners for something like the build process to package your application. It’s easy to get started.
With the upcoming Vite integration, let us build our own simple Vite package (for educational purposes).
Getting started
Let’s start a new Nx workspace for our plugin development. Nx comes with two scripts to easily scaffold a whole workspace. These are create-nx-workspace and create-nx-plugin. The first one creates a new Nx workspace, so you probably used it already if you have ever used Nx. The second script creates an empty workspace with a new Nx plugin. Let’s get started:
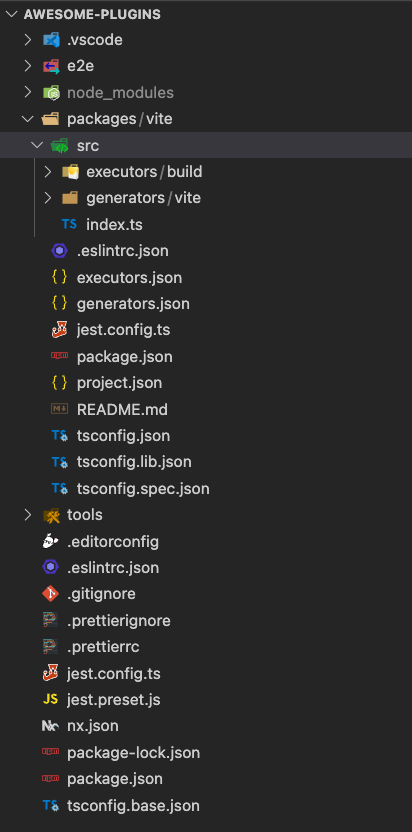
npx create-nx-plugin awesome-plugins --pluginName viteIt will create a new Nx workspace with the new plugin. The file structure looks like this:
A Nx plugin is just a regular npm package with some special marker files referred in the package.json. Here is our package.json:
{
	"name": "@awesome-plugins/vite",
	"version": "0.0.1",
	"main": "src/index.js",
	"generators": "./generators.json",
	"executors": "./executors.json"
}
It’s generated into our Vite project and will be part of the package. It is just a regular package.json, except for the additional fields generators and executors. A generator is how Nx generates files, and an executor executes tasks like build or test. With these config files referred to in the package.json, Nx can find out what our plugin can do and what Nx can run with it.
Generators
Let’s start with generators. Generators are the way to generate files in Nx. They are easy to use because they are plain Typescript with helper functions from the Nx devkit. The generator from @nrwl/nx-plugin (loop closed, you created an Nx plugin with an Nx plugin) created a generator called vite for us.
...

export default async function (tree: Tree, options: ViteGeneratorSchema) {
  const normalizedOptions = normalizeOptions(tree, options);
  addProjectConfiguration(tree, normalizedOptions.projectName, {
    root: normalizedOptions.projectRoot,
    projectType: 'library',
    sourceRoot: `${normalizedOptions.projectRoot}/src`,
    targets: {
      build: {
        executor: '@awesome-plugins/vite:build',
      },
    },
    tags: normalizedOptions.parsedTags,
  });
  addFiles(tree, normalizedOptions);
  await formatFiles(tree);
}
The shown function is the primary function of our generator. Generators are functions with a given signature. The first parameter is tree from type Tree. The Tree object is an abstraction of the filesystem and has methods to read, write and delete files. The second parameter here is specific to the generator. Besides the generator.ts the nx-plugin package created two files, the schema.d.ts and the schema.json. The schema.d.ts looks like this:
export interface ViteGeneratorSchema {
	name: string;
	tags?: string;
	directory?: string;
}
It’s the Typescript inteface matching our generator parameters. A generator can have any number of parameters. If you call the generator like this:
nx generate @awesome-plugins/vite:vite --name=my-libThe Nx cli will call your generator function and creates the object with type ViteGeneratorSchema filled with all your parameters. The second file is the schema.json and looks like this:
{
	"$schema": "http://json-schema.org/schema",
	"cli": "nx",
	"$id": "Vite",
	"title": "",
	"type": "object",
	"properties": {
		"name": {
			"type": "string",
			"description": "",
			"$default": {
				"$source": "argv",
				"index": 0
			},
			"x-prompt": "What name would you like to use?"
		},
		"tags": {
			"type": "string",
			"description": "Add tags to the project (used for linting)",
			"alias": "t"
		},
		"directory": {
			"type": "string",
			"description": "A directory where the project is placed"
		}
	},
	"required": ["name"]
}
The schema.json is the cli configuration for your interface. You can set descriptions, default values, aliases, and so on for all parameters. Furthermore, it’s possible to configure which parameters are required and which are optional. The Nx cli will use this file to show the descriptions to the user of our plugin and show errors, if required and the $default configuration for the name field allows to leave the --name parameter and just use the first parameter for it, like this:
nx generate @awesome-plugins/vite:vite my-libNow we know how to push parameters into our function, let’s see what we can do with them. The vite generator does two main things, add some files and add a project configuration for the project generated by your generator. Let’s take a look at the files first. In your generator there’s a function called named addFiles(). This function is defined in the same file and looks like this:
function addFiles(tree: Tree, options: NormalizedSchema) {
	const templateOptions = {
		...options,
		...names(options.name),
		offsetFromRoot: offsetFromRoot(options.projectRoot),
		template: '',
	};

	generateFiles(
		tree,
		path.join(__dirname, 'files'),
		options.projectRoot,
		templateOptions
	);
}
The function generateFiles comes from the @nrwl/devkit package. The Nx devkit brings some useful functions you usually need to create plugins. (The @nrwl packages like @nrwl/angular or @nrwl/react also use them, so they’re battle-tested by Nx.)
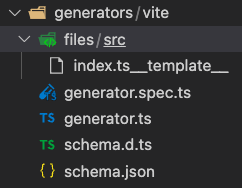
The generateFiles function takes the tree object into which the files should be generated. The other three parameters are the folder where the templates for the files are taken from, here the files directory in the same directory as the generator. The files directory contains a src dir with a file index.ts__template__.
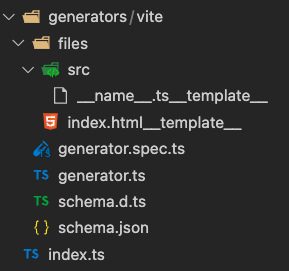
The notation __template__ is the syntax for variables in filenames. Variables for templates are taken from the templateOptions object. It is just a plain Typescript object and every matching field from the object replaces the variable. The __template__ will be replaced with an empty string. Let’s rename the file. We change the filename from index.ts__template__ to __name__.ts__template__. The name parameter used to set the name of your generated project now also is used to define the filename of the first file. After that, we create a new file index.html__template__ directly into the files directory and add the following content:
<!DOCTYPE html>
<html lang="en">
	<head>
		<meta charset="UTF-8" />
		<title><%= name %></title>
	</head>
	<body>
		<div id="app"></div>
		<script type="module" src="/src/<%= name %>.ts"></script>
	</body>
</html>
The variable syntax for templates is <%= name %>. Again, they will be replaced while generating the files from the templateOptions object. After that, our generator directory looks like this:
Our generator is now prepared to create the files we want. Let’s look at the configuration of our newly generated project. Our generator contains the following snippet:
addProjectConfiguration(tree, normalizedOptions.projectName, {
	root: normalizedOptions.projectRoot,
	projectType: 'library',
	sourceRoot: `${normalizedOptions.projectRoot}/src`,
	targets: {
		build: {
			executor: '@awesome-plugins/vite:build',
		},
	},
	tags: normalizedOptions.parsedTags,
});
The function addProjectConfiguration will exactly do what it is named. For our Nx workspace, it will create the project.json file for us. The created file will contain the following:
{
"$schema": "../../node_modules/nx/schemas/project-schema.json",
"name": "mygeneratedlib",
"projectType": "library",
"sourceRoot": "libs/mygeneratedlib/src",
"targets": {
"build": {
"executor": "@awesome-plugins/vite:build"
}
},
"tags": []
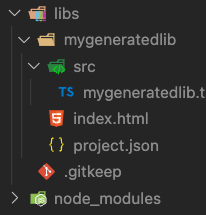
}This is the configuration for our generated project. The whole project after you use your new plugin will be like this:
The configuration contains essential pieces of information like the sourceRoot and projectType, together with the targets. Possible targets are something like build and test, but they can be whatever you need. To be able to call Vite, we need to be sure it is added into the package.json. To do this, add the following into the generator, right after the addFiles call:
...
addDependenciesToPackageJson(tree, {}, {
	vite: '^3.2.4'
});
...
Again, this is a function from the nx devkit that helps add dependencies and install them. It will read the package.json from the Tree and add dependencies and devDependencies.
Now we have our dependency installed, let’s implement our own build target for Vite.
Executors
As already said, executors are the Nx way to do something with your project. Parameters are identical to the generators configured. There is a schema.json file and a schema.d.ts file for them. The created Vite project already contains a build executor, which logs something and returns success:true.
export default async function runExecutor(options: BuildExecutorSchema) {
	console.log('Executor ran for Build', options);
	return {
		success: true,
	};
}
If you now used the generator to create mygeneratedlib, you can use:
nx build mygeneratedlibThe cli will log the message and exit. That’s it. But we want to create our great Vite package, so we need to adjust things a little. First, we add the second parameter context: ExecutorContext to our function signature. Now we can look into the ExecutorContext with useful pieces of information about the workspace.
From the context, we can take the projectDir path we need for the Vite build process. Vite itself exposes a build function to start the build process, and we need to add the root where the process should be started. After that we choose an proper outDir to match the Nx file structure.
export default async function runExecutor(options: BuildExecutorSchema, context: ExecutorContext) {
	console.log('Executor ran for Build', options);

	const projectDir = context.workspace.projects[context.projectName].root;
	const distDir = joinPathFragments(`dist/${projectDir}`);

	await build({
		root: `${context.root}/${projectDir}`,
		build: {
			outDir: relative(projectDir, distDir)
		}
	});

	return {
		success: true,
	};
}
This is all we need to add a working Vite build process. Vite is just an example, but if you can run something from typescript, you can run it from an nx executor. Start to integrate whatever you want into Nx.
A demo workspace can be found here.
Testing
In the second part we will talk about how to test your plugin features.